Sam Brown & Telescope Making
Sam Brown? Who was he?
Sam Brown (1906–1976) was a very knowledgable technical writer and illustrator who wrote/worked for various publications and businesses, including Popular Mechanics during the mid 1900s His explanations were accompanied by superb illustrations that simplified “difficult” or technical topics. He was very reclusive so little is known about his life but he may have had training as an engineer because his range of knowledge and ideas were extensive. He was certainly an amateur astronomer and responsible for writing an abundance about amateur astronomy and telescope making for Edmund Scientific Company (from 1942 to about 2000). During its day, especially the 1960s and 70s, Edmund had a fabulous catalogue listing optics, telescopes, telescope components, scientific instruments and other science-related novelties that all of us amateur astronomy nerds relished. Edmund Scientific Company had Sam Brown write about topics for amateur astronomers and building telescopes, especially listing and incorporating parts sold by Edmund. Edmund sold the various topics individually or as an inclusive 192 page book titled, All About Telescopes, which had a price of $3.00, at least when I bought a copy. This book is great for ideas on making a telescope, including making a reflector mirror.
GET A FREE COPY!
Click on the cover to take you to a webpage where you can legally download a PDF of
All About Telescopes. The listing for it is at the bottom of that webpage.
The Basic Steps to Making a Reflector Telescope Mirror
1. Read my 36-year Odyssey PDF above. Download All About Telescopes and read/study the 26 pages on making a reflector telescope mirror. You will have to study it to fully understand it, especially the part on testing and parabolizing the mirror. You will stand and walk around a barrel or pedestal for most of the entire process—not fast enough to get dizzy. You may spend anywhere from 12 to 24 or more hours going in circles.
2. ROUGH AND FINE GRINDING. To create a curve in the mirror, so that it will focus light, you “rub” two pieces of glass together in simple patterns with grit and water between to slowly create the curve. One of the pieces of glass is the tool and the other is the actual mirror. The mirror usually stays on top. The grit is like sand and you go from course to very fine using about 7 or so grades. The very fine grit is almost like baby powder. Maybe 12 hours.
3. POLISHING. After grinding, and the mirror’s surface will be very smooth, you then polish it to make it perfectly clear—like glass. This requires placing a layer of pitch, which is like a hard tar, on the tool and using a polishing compound to get the mirror to look just like glass. Maybe 4 to 8 hours.
4. TESTING & POLISHING TO A SPHERE. After the mirror is fully polished, you then have to test it with an instrument that you will most likely make. This testing provides information on the exact shape of the mirror. You want it to be spherical when you finish polishing. If it tests with another shape, you will then polish it some more to make it spherical (using specifics strokes).
5. TESTING & PARABOLIZING. Once the mirror is spherical, you then use the same polishing setup, coupled with specific strokes, to change the shape from spherical to parabolic. You have to test the mirror using the testing instrument to check for it being the correct shape. This is a fairly tedious process and if you “overshoot” you have to polish the mirror back to a spherical shape and then try again to make it a parabolid. If you are really lucky, 30 minutes but probably 2 to 6 hours.
6. ALUMINIZING. When you are satisfied with the shape of your mirror, you send it off to a business that can put an aluminized coating on it to make it into an honest-to-god mirror! You can make the rest of the telescope before sending the mirror off and this will be a good way to test the mirror on the Moon and bright planets.
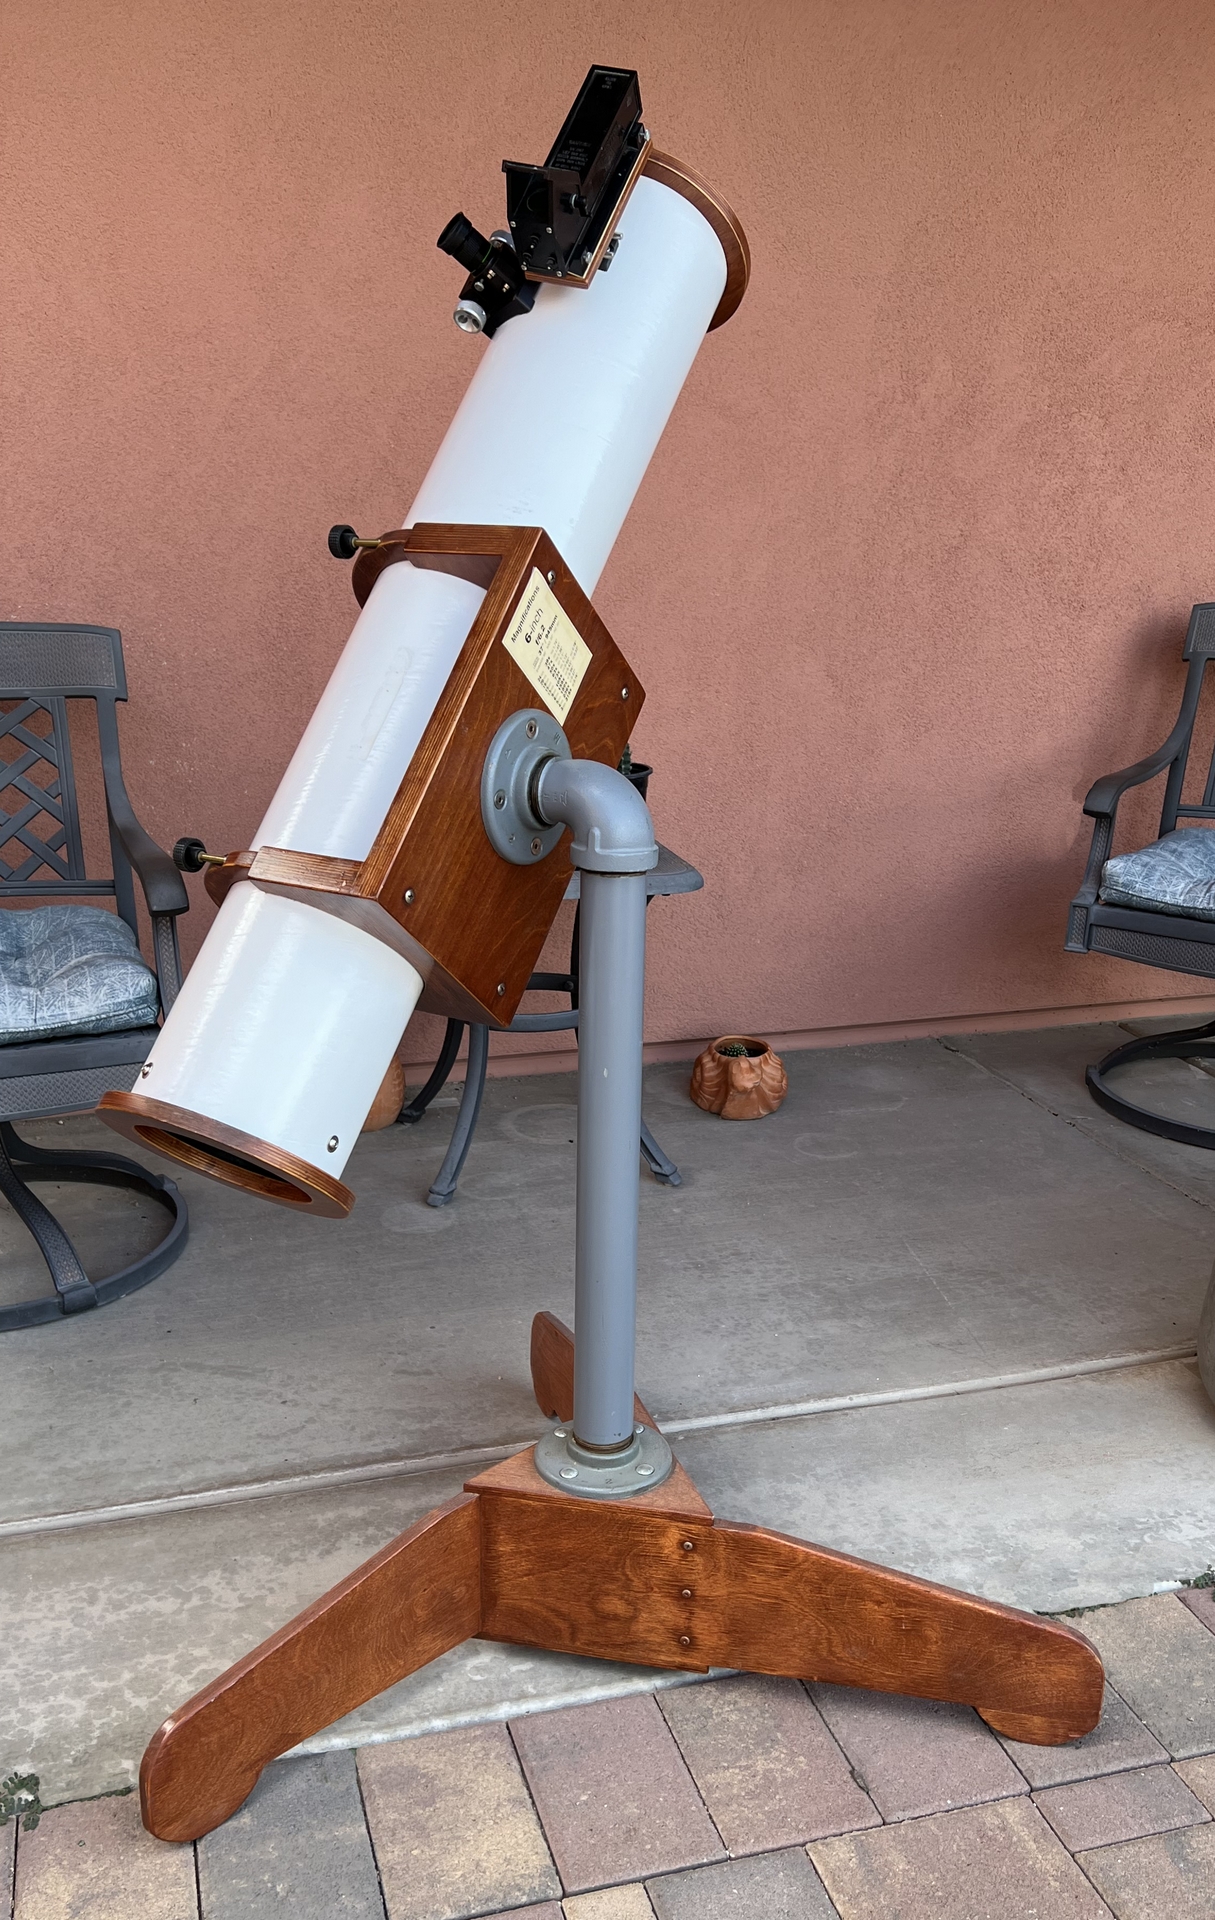
7. THE TUBE, MOUNT, STAND, AND COMPONENTS. After the mirror is complete (or before), you have to make the rest of the telescope. Some parts, like the focuser, you can buy but the mount and stand will probably be homemade. The more woodworking and metal tools you have the easier it will be to complete your telescope. Over the years, I have seen individuals with machinist skills make incredible scopes and the same for those who know how to work with wood.
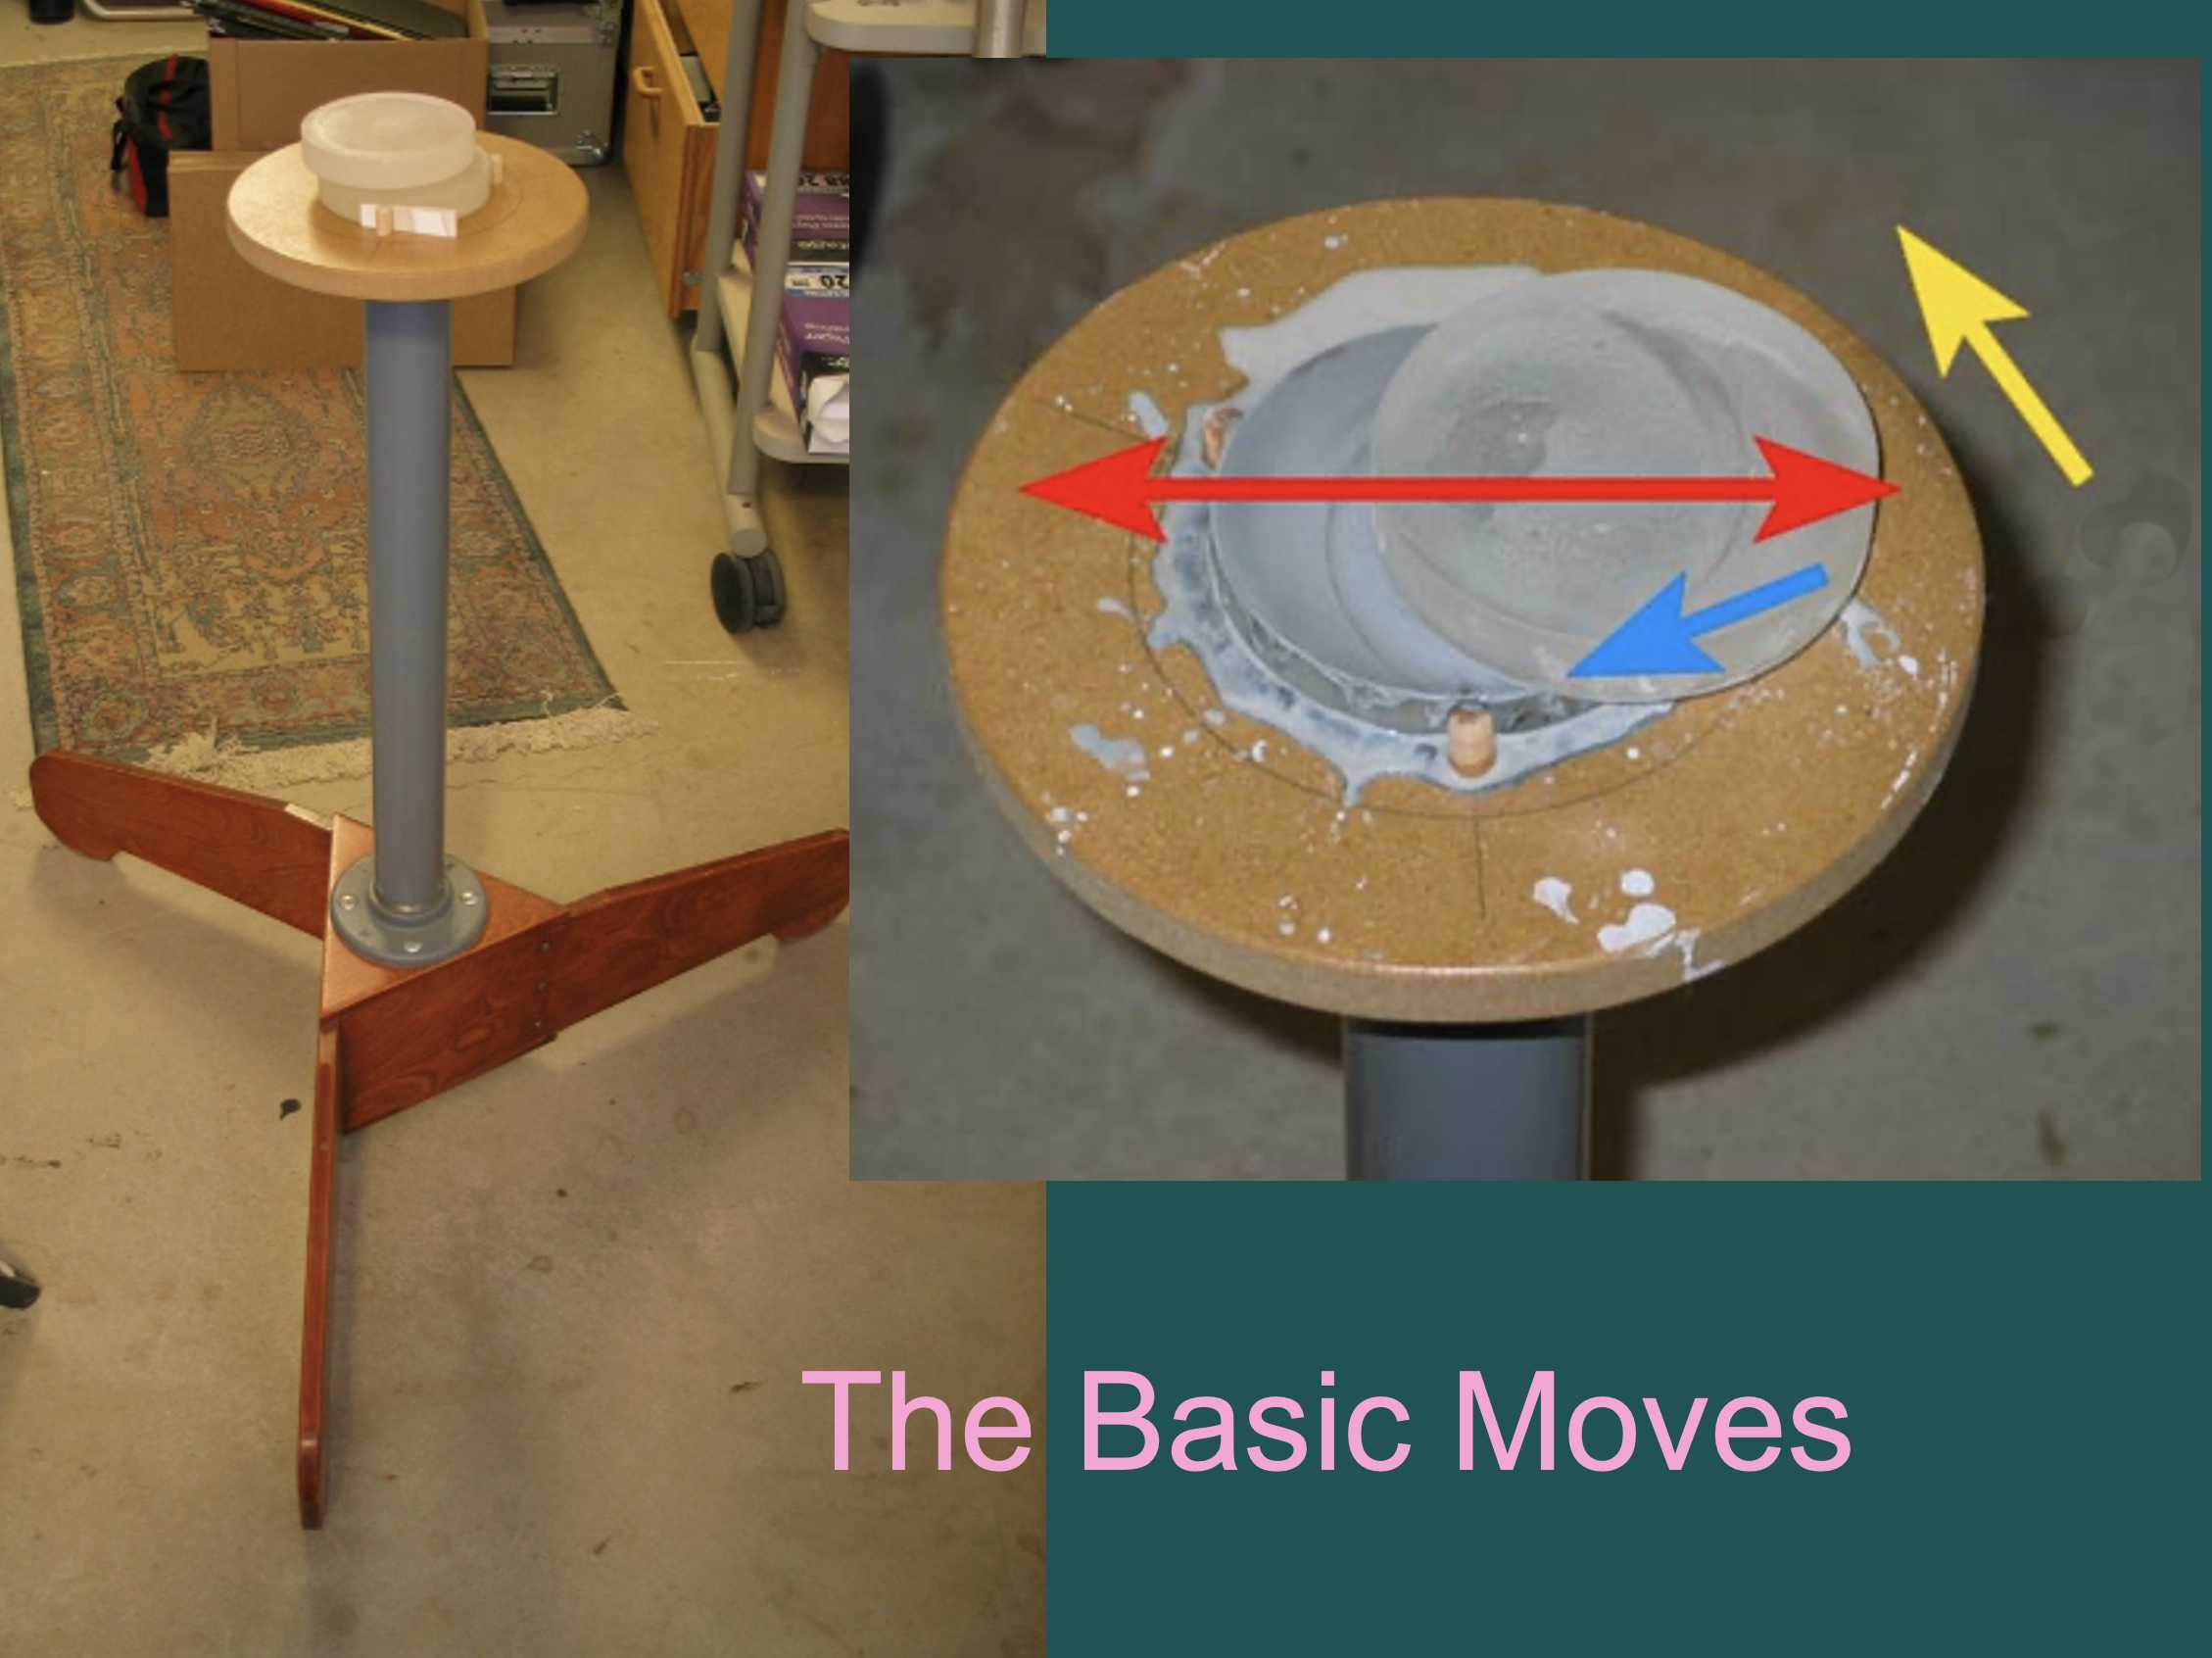
You will need some sort of stand to hold the mirror and tool at about waist level. Pictured is a stand that I made for a telescope—it came in handy for grinding. The basic movements are a back and forth shown by the red arrow, make six or seven of these, then you rotate the mirror a bit clockwise, the blue arrow and at the same time move your body around the stand counterclockwise a little, the yellow arrow. The grayish stuff is the grit, like sand, that will carve the spherical shape into the mirror. Many have used the top of a 55 gallon drum to grind+ their mirrors.
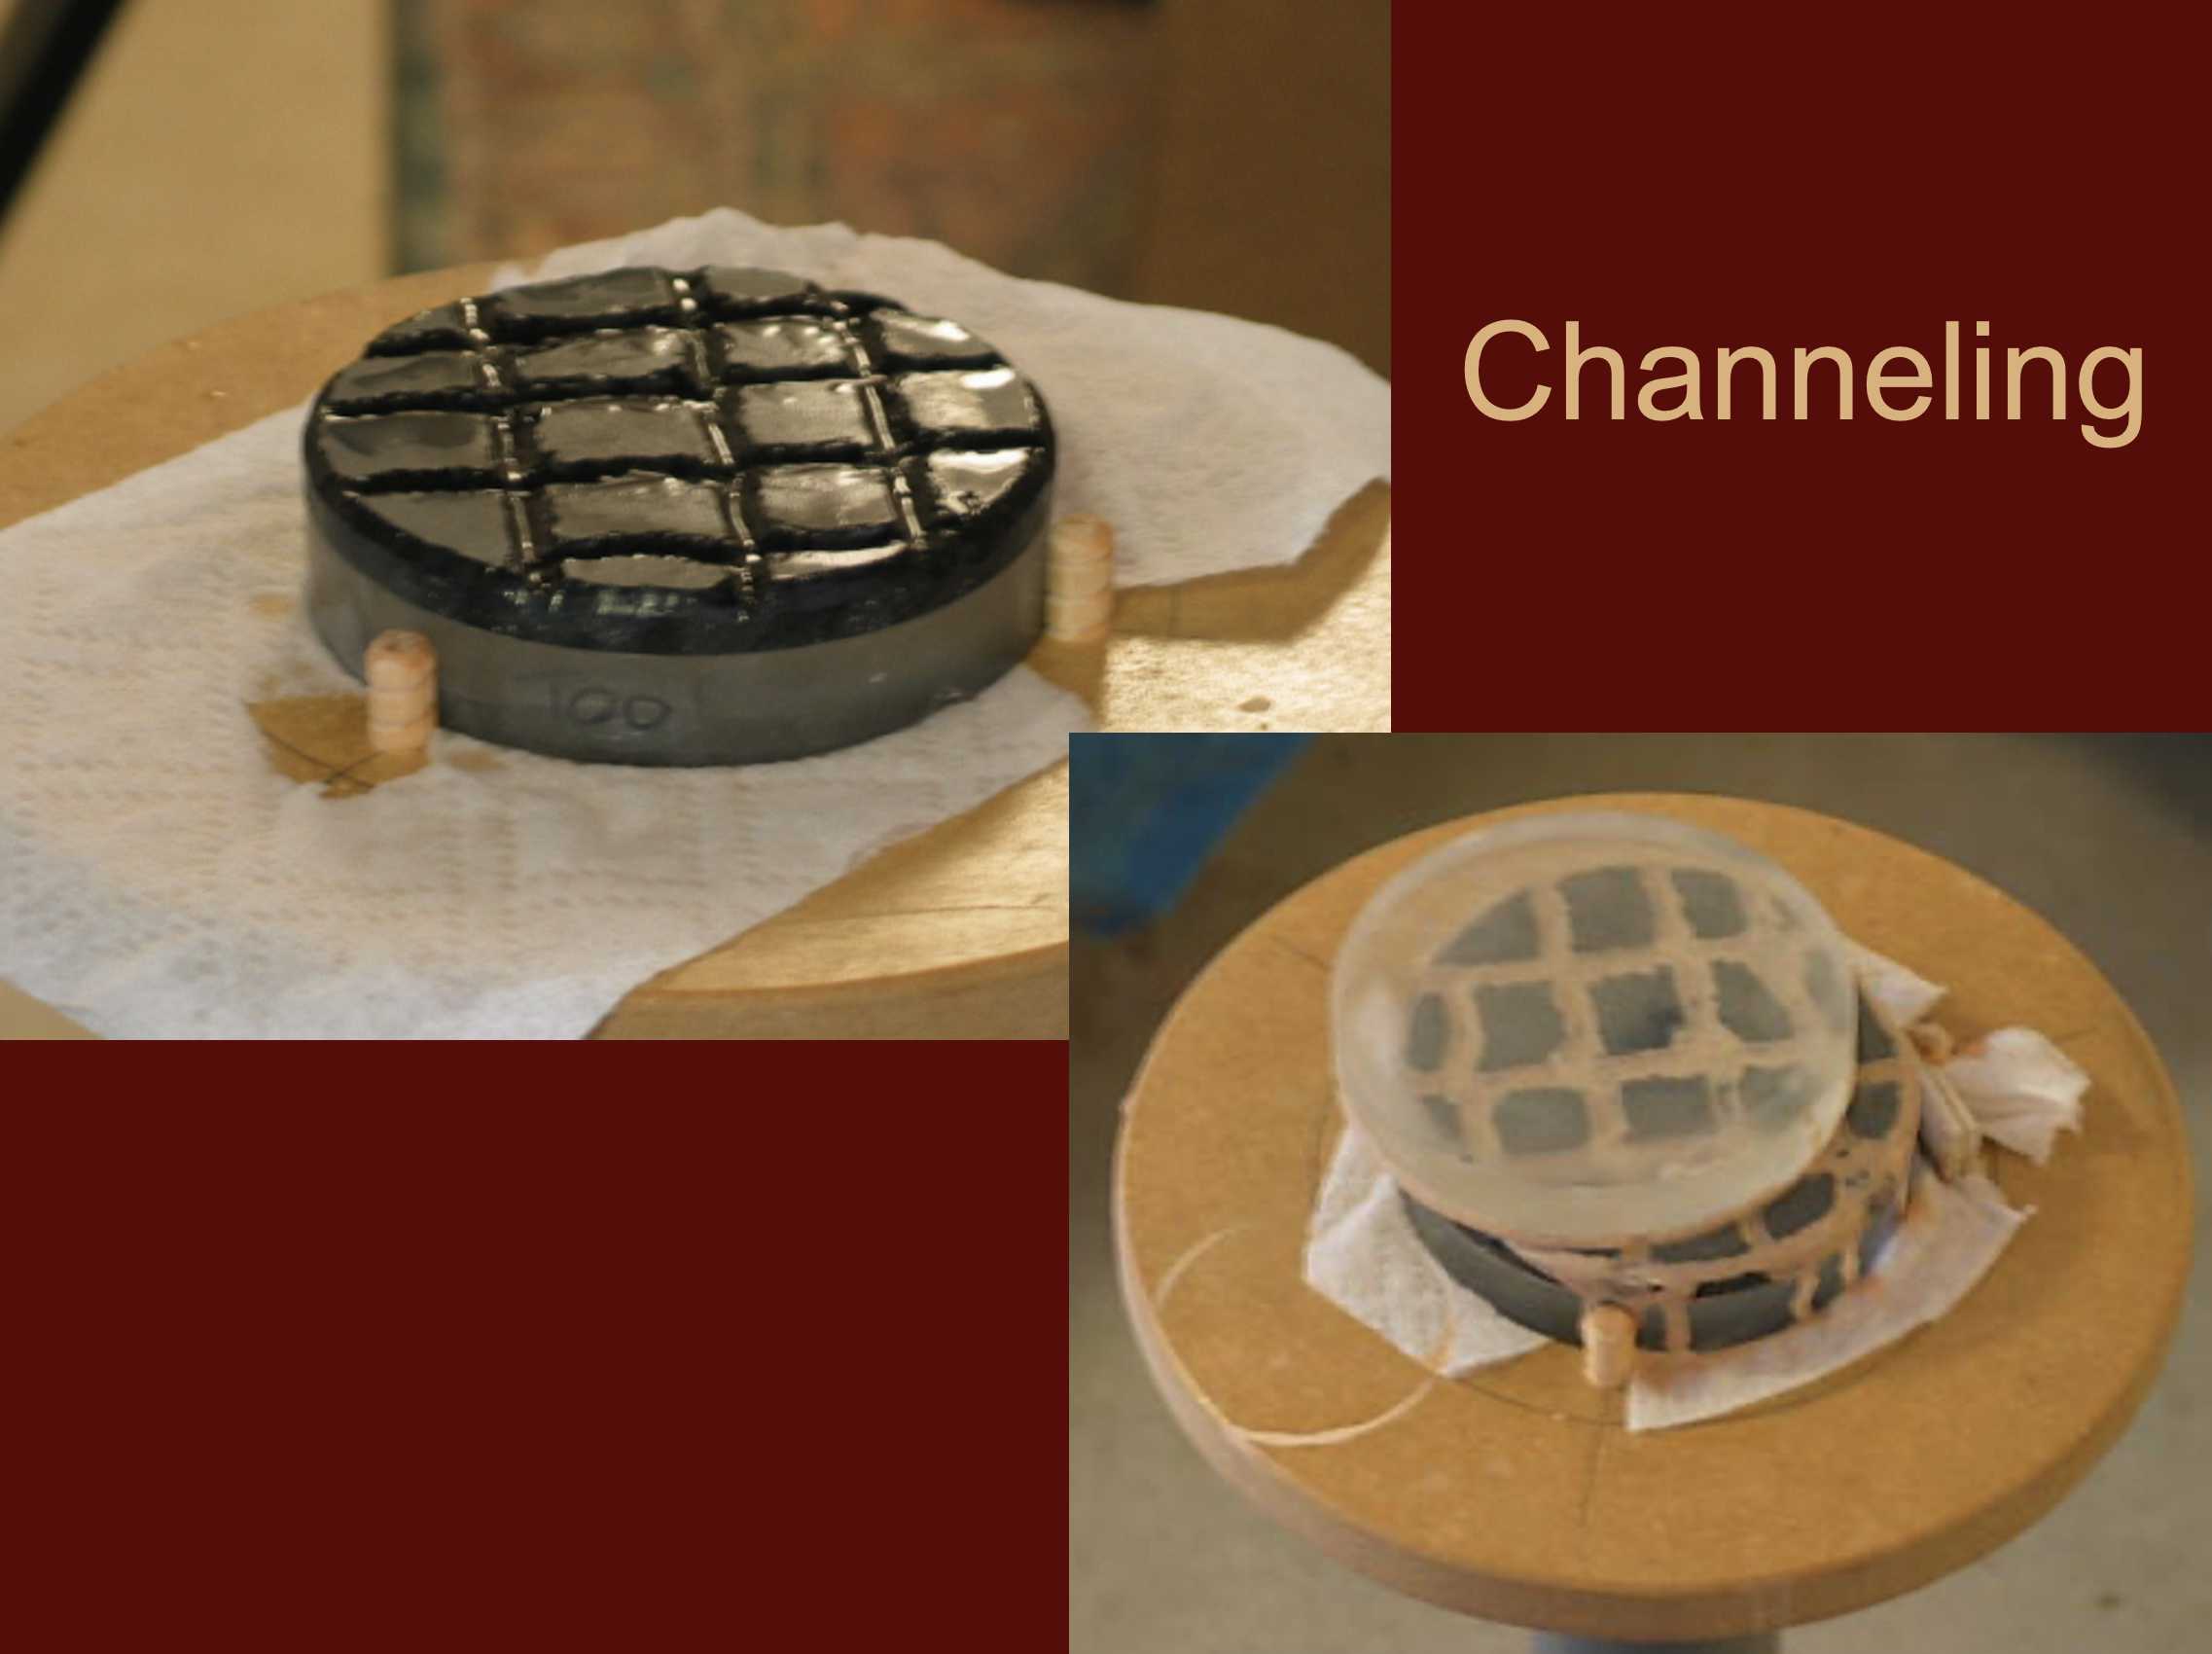
A thick pitch lap is made on the tool and channels are cut into it for the polishing compound to move/drain and to increase the polishing action. The pitch, which is like a hard tar, is gently warmed up on a stove until it is a liquid and poured onto the tool—the tool has a paper collar around it to get a level amount of pitch. Once the pitch cools, you cut groves or channels into it — I use a Dremel tool to cut the channels.
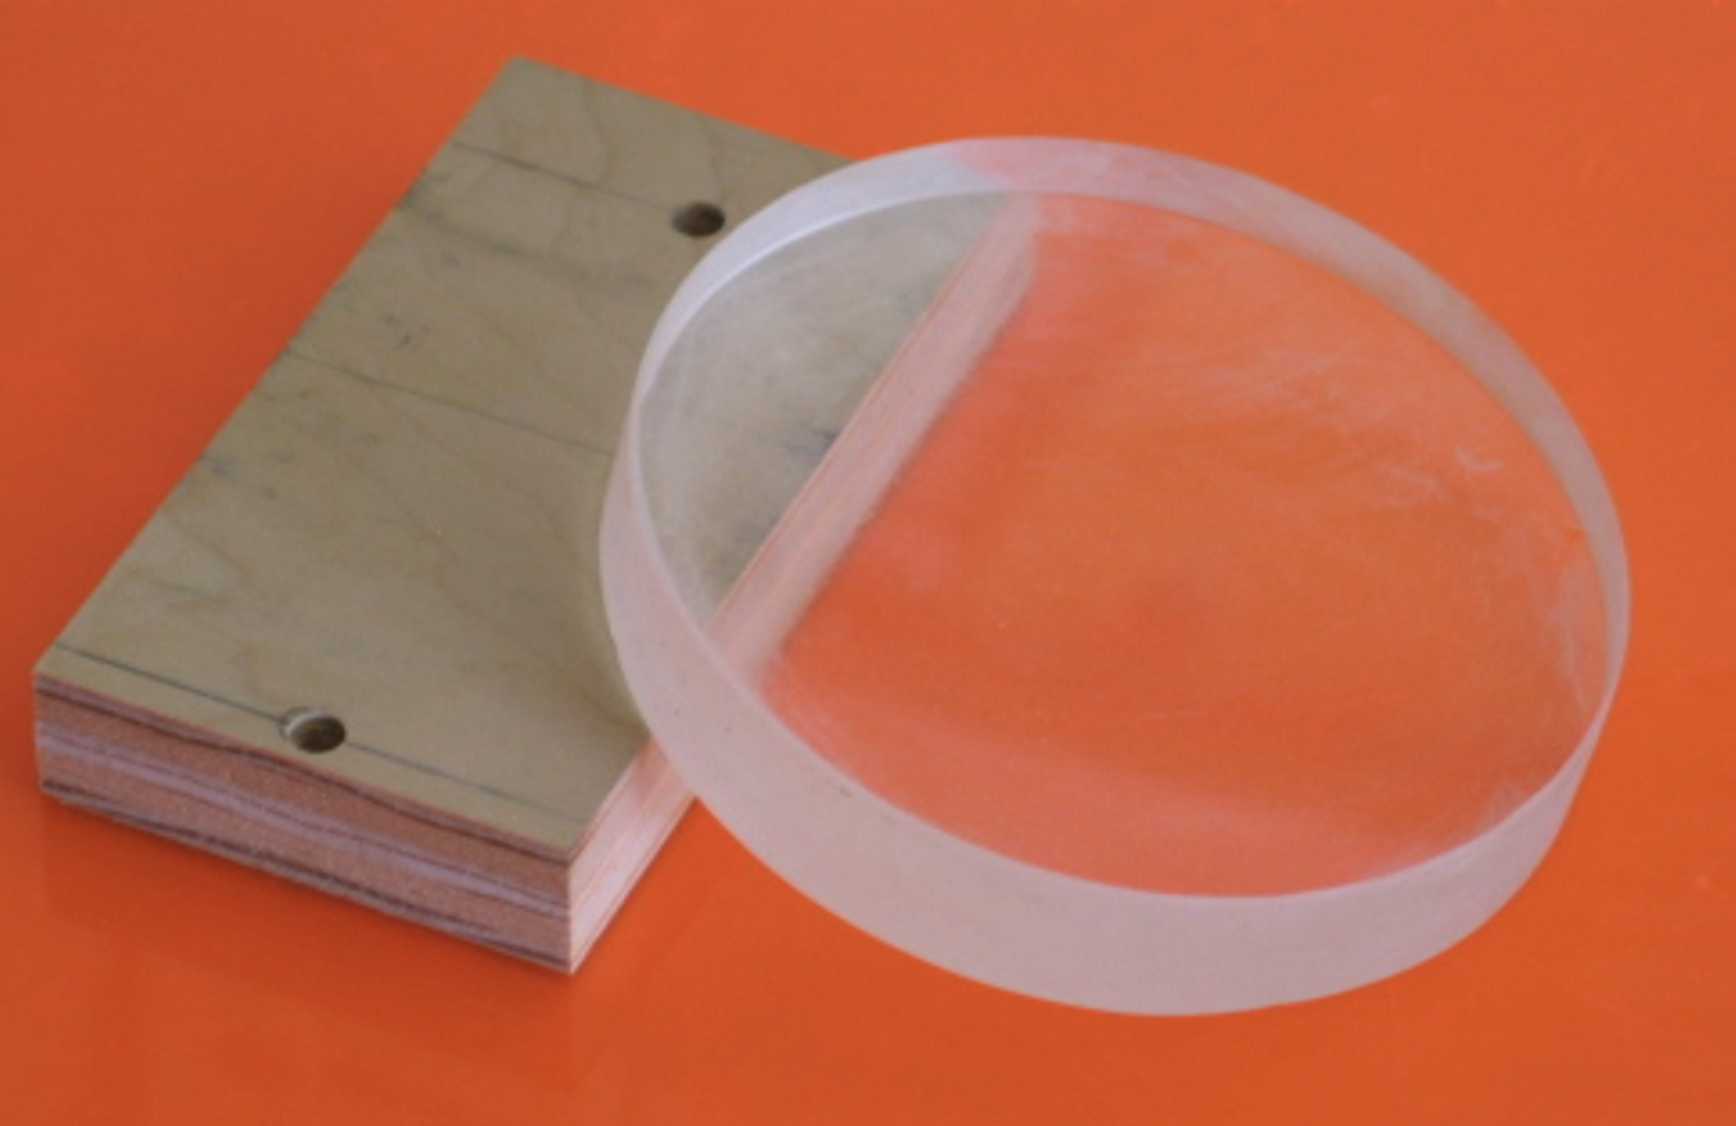
A completely polished and figured mirror ready to be sent off to be aluminized—so it will actually be a mirror.
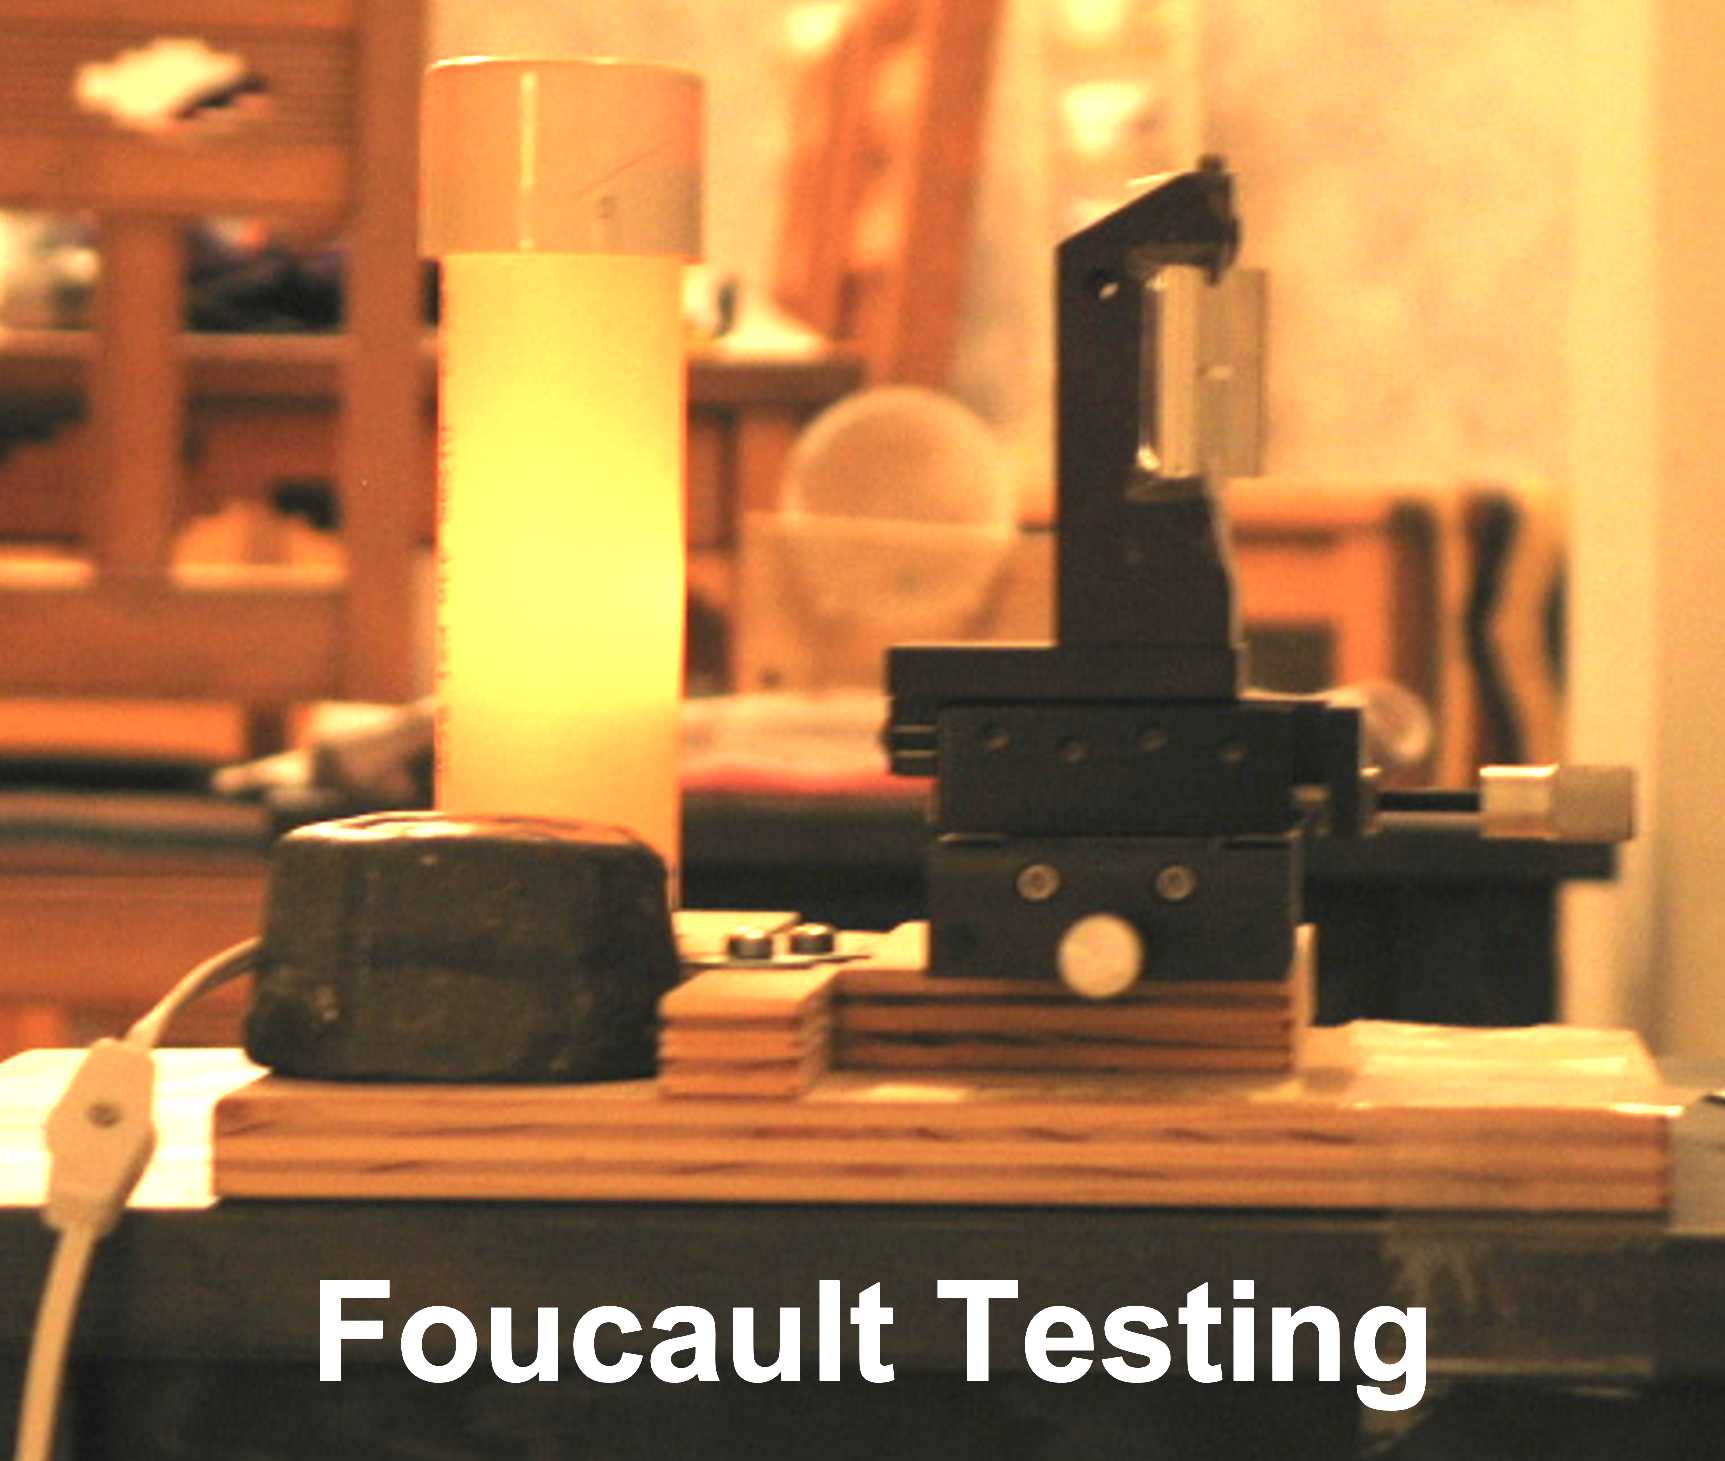
There is no way to easily explain the testing process. It makes the most sense when you have to do it. But, you can study the section on Testing in All About Telescopes to give you a sense of the process. You will most likely have to make your own Foucault Tester. Mine is above and it is basically a jury-rigged setup. The white tube has a light in it and a small opening on the other side which shines the light to the mirror placed in front of it (the round circle in the middle of the picture with a line through it). The light from the mirror is reflected back to the weird black thing to the right of the light that has a razor blade taped to it. With your eye next to the razor blade, you see certain shapes (shadows) and measure them to determine if your mirror has the right shape.